Introducing Issue Verification and Ship-It! Revocation

We’ve all been there…

It’s a week before the deadline. Your team is working through the night, eager to land their changes as quickly as possible. Your teammate, Jake, was feeling frazzled as he was trying to fix all the issues that had been filed on his review request. He’d just finished the issue you had filed and marked it “fixed.” Shortly after, another teammate files a new review with a “Ship It!” Breathing a sigh of relief, and eager to go home, Jake immediately lands the change.

It wasn’t until after the release of the product that you realized Jake had missed something important in your feedback. While his change had fixed the bug, it had broken another feature. You hadn’t had the chance to look over his change after he’d fixed it, since you were busy and it had fallen off your dashboard once it landed. If only Jake knew you wanted to take a second look, the release would have gone a lot more smoothly.

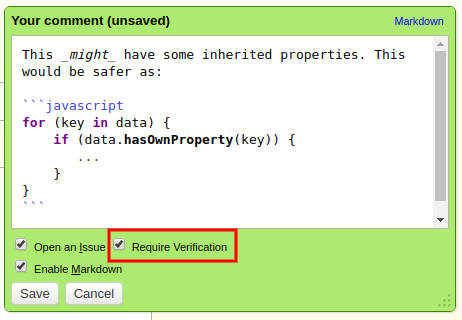
With Review Board 3.0, you can prevent this from ever happening again. We’ve added a new feature, Issue Verification, which keeps issues open until the reviewer has a chance to verify the fix.

You can activate this feature by checking the “Require Verification” box when opening a new issue.


Once the owner of the change resolves the issue as “Fixed” or “Dropped,” the status will change to “Pending Verification.” At this point, the issue is still considered open. It will be up to the reviewer to look over the fix and click “Verify Fixed” before it can be closed.


Filed a Ship It! prematurely and wish you could take it back?

Now you can with Review Board 3.0’s new Revocable Ship It! feature. The “Ship It!” label on any reviews you file will now have a little “x” button. Just click and confirm that you want to revoke it, and the review’s “Ship It!” tag will be removed, with the “Ship It!” text crossed out in the review.


These new features will help ensure that important reviewer feedback is addressed and that an unintentional or outdated “Ship It!” review no longer lets changes into the codebase prematurely. These features have been requested by many of you, and we would love to hear if they improve the review process for your team!

Read More

Introducing Slack Support in Review Board 3.0

One of the highlights of the recently release Review Board 3.0 is our new integration with Slack. Projects and companies around the world use Slack for communication and collaboration within their teams. It also hooks into third-party products and services to provide live updates in chat. By enabling the Slack integration in Review Board 3.0, you will be able to keep your team informed of discussions and updates on review requests as they happen.


You can create as many Slack configurations as you need for your company. Each configuration can be customized based on your needs. For example, review requests for different groups can go to different channels. Those containing sensitive information such as security fixes can be filtered out entirely.


Getting Started

First, create an incoming Webhook integration on Slack. Once it has been created, Slack will generate a Webhook URL, which you’ll plug into Review Board in your new configuration. To create that configuration, open the Administration UI in Review Board and navigate to Integrations → Slack → Add A New Configuration. Paste your Webhook URL, like so:


Now you’re ready to customize your configuration by adding conditions. By default, a Slack configuration will post all discussions and updates to the channel. If you want to limit what’s posted, you can add one or more conditions to your configuration. These will operate off the data in the review requests being sent to Slack.


You have a lot of options when adding conditions. You can include or exclude messages depending on the review groups, repositories, summary and description content, branch field, and more. Custom extensions can even add new options, giving further control based on data and logic provided by the extension.

We hope this new integration will be a big help for your team members and your company as a whole. This has been a highly anticipated feature for some time now, requested by many of our users. We are excited to finally be able to bring it to you!

Read More

Better branch navigation with git-j

One of Git’s core strengths are its simple, light-weight branches. Spend any time working with Git and you’ll soon develop the habit of creating feature branches for any change. As your project grows, you may start to introduce release branches, hotfix branches, and long-running feature branches.

Navigating between branches becomes a common task. A simple git checkout <branchname> is all it takes. Not so bad, but if you’re frequently switching between branches, all the typing can add up.

That’s where git-j comes in.

git j is not only faster to type than git checkout, but it also offers some quick shortcuts for fast branch navigation, making it just as easy as directory navigation.

Here, I’ll show you.

Go up a branch with git j ..

Much like directory navigation, git j .. jumps to the nearest parent branch.

Let’s say you have this branch scheme:

o [topicB] [HEAD]
|
o [topicA]
|
o [master]
|

Say you want to go down a level to topicA, do some work, and then go down again to master. Using git j ..:

$ git j ..
# Do some work
$ git j ..

Now you’re on master. Check out the savings compared to git checkout:

$ git checkout topicA
# Do some work
$ git checkout master

Hey look, you’ve saved 22 keystrokes!

Jump to your previous branch with git j -

Ever find yourself switching back-and-forth between two branches? We have a handy shortcut for that.

Let’s go back to our branch scheme from before. You’re on topicB, and you need to go down a branch to topicA, do some work, and jump back to topicB.

Simple.

$ git j ..
# Do some work
$ git j -

Much nicer than the alternative:

$ git checkout topicA
# Do some work
$ git checkout topicB

That’s another 23 keystrokes saved.

Use aliases for common branches

You probably have a few branches you’re frequently on, and I bet one of them is master. Let’s say that another is release-1.0.x. Oh, let’s also throw in something like 2.0/big-refactor on top of that.

How often are you typing those branch names? Every typo any of them? I sure have.

We can shorten all those names with git j alias. Let’s give them nice, short, easy-to-remember names:

$ git j alias m=master
$ git j alias 1.0=release-1.0.x
$ git j alias rf=2.0/big-refactor`

Now instead of typing those branch names, all you have to do is pass the aliases to git j, like so:

$ git j m
$ git j 1.0
$ git j rf

Much nicer than:

$ git checkout master
$ git cehckout release-1.0.x
$ git checkout 2.0/big-refactor

Wouldn’t you say?

I use that m alias all the time, since practically all Git repositories have a master branch. Instead of setting up an alias for all of them, I can make a global alias:

$ git j alias -g m=master

Now git j m will work wherever I go!

To unset an alias, just pass an empty branch name:

$ git j alias rf=

By the way, if you ever need to check which aliases you’ve set up, just simply type git j aliases. For global aliases, git j aliases -g.

Working with branch history

git j keeps track of which branches you’ve checked out most recently, and makes it easy to jump between them.

Simply run git j history to see what your branch history looks like.

Want to quickly jump to a branch in your history? git j <number> is all you need. For instance, git j 2 will jump 2 branches back in your history.

Putting it all together

Okay, here’s a big, real-world-ish example. Our Review Board repository has master and release-2.0.x branches, and I’ve introduced a my-feature branch. In this example, I’m going to:

  1. Work on release-2.0.x.
  2. Rebase my-feature on top of it.
  3. Merge it into release-2.0.x.
  4. Merge the latest release-2.0.x changes into master.
  5. Go back to working on release-2.0.x.

First, here’s how you’d traditionally do this with Git:

# 1. Work on release-2.0.x.
$ git checkout release-2.0.x

# 2. Rebase my-feature on top of it.
$ git checkout my-feature
$ git rebase release-2.0.x

# 3. Merge it into release-2.0.x.
$ git checkout release-2.0.x
$ git merge my-feature

# 4. Merge the latest release-2.0.x changes into master.
$ git checkout master
$ git merge release-2.0.x

# 5. Go back to working on release-2.0.x.
$ git checkout release-2.0.x

Now let’s try it with git j, and with a couple of aliases (m for master, 2.0 for release-2.0.x):

# 1. Work on release-2.0.x.
$ git j 2.0

# 2. Rebase my-feature on top of it.
$ git j my-feature
$ git rebase release-2.0.x

# 3. Merge it into release-2.0.x.
$ git j ..
$ git merge my-feature

# 4. Merge the latest release-2.0.x changes into master.
$ git j m
$ git merge release-2.0.x

# 5. Go back to working on release-2.0.x.
$ git j -

How’s that for less typing? As you start to work with git-j, it’ll all start feeling more natural, just like walking a filesystem.

Get started with git-j today!

Simply clone our dev-goodies repository and stick dev-goodies/bin/git-j somewhere in your path. Or, stick all of dev-goodies/bin/ in your path to get easy access to all our scripts.

We’ll talk more next week about another extremely useful git script we provide called git-rebase-chain. Stay tuned!

Read More

An effective RBTools workflow for Git

Update: We’ve documented this workflow in the RBTools documentation. The following still applies, but for more details and tips, see the docs.

One of the beautiful things about Git is that you have so many ways of making it work for you. This is also one of the frightening things about Git, particularly if you’re just starting out. There’s loads of documentation and blog posts covering all the ways you can use Git to manage your code or shoot yourself in the foot.

A question we’re often asked is how Git is supposed to be used with Review Board or RBCommons.

“How should I post changes,” they ask. “How should I land them?”

“Well,” we say, “that’s up to you… but here’s how we do it.”

One branch per review request

Branches in Git are pretty great. They’re light-weight, and you can really choose when and how to use them.

What we like to do is have one branch for every review request we’re still working with. Maybe they’re branching off of master, or maybe off of another change you have up for review… doesn’t matter.

Create the branch, and create as many commits on it as you want. You’re going to post these all for review under one review request. For our example, we’ll use 2 commits.

$ git checkout -b my-branch-1 master
$ vim foo.py
$ git commit -a
$ vim bar.py
$ git commit -a

Now let’s create another branch off of that, and make one commit here. This will be for your second review request.

$ git checkout -b my-branch-2
$ vim foo.py
$ git commit -a

Your tree now looks like this:

o [my-branch-2]
|
o [my-branch-1]
|
o
|
o [master] [origin/master]
|

Great, let’s post!

We’ll post that first change for review (my-branch-1). Since it’s based off of origin/master, this will be easy (since by default, that’s what’s diffed against). We just post like so:

$ git checkout my-branch-1
$ rbt post
Review request #1001 posted.

https://reviewboard.example.com/r/1001/
https://reviewboard.example.com/r/1001/diff/

Excellent. If you go to that first URL, you’ll see your summary and description filled in from your commit messages. You can edit these to your liking.

If your server has any default reviewers set up, they’ll be assigned. You might also want to fill in some bug, add some testing information. Do whatever you want to do there and publish the review request.

Now sit back and relax and… oh wait, you have a second change ready for review! Thanks to Git and RBTools, you don’t have to wait on that. Let’s post that one too.

$ rbt post my-branch-1..my-branch-2
Review request #1002 posted.

https://reviewboard.example.com/r/1002/
https://reviewboard.example.com/r/1002/diff/

What you’re doing here is posting all the commits on my-branch-2 that were made since my-branch-1. No need to push my-branch-1 first, or really worry about it in any way.

You’ll probably want to set the Depends On field to point to your other review request, as a hint to any reviewers deciding which to review first.

Oh, here’s some short-hand. If you’re already on my-branch-2, you can make use of HEAD instead of spelling out my-branch-2. In this case, this branch only has one commit, so you could also leave out my-branch1... All of these are therefore equivalent:

$ rbt post HEAD
$ rbt post my-branch-1..HEAD
$ rbt post my-branch-1..my-branch-2

This is probably familiar to you if you’re used to Git. You can use any Git SHA/tag/branch/revision range you want when calling rbt post.

Note: If you’re posting against a remote branch other than origin/master, you’ll need to either pass --tracking-branch=myremote/mybranch on any RBTools command, or set TRACKING_BRANCH = "myremote/mybranch" in .reviewboardrc. The remote must match the configured repository on Review Board.

Need to make some changes? -u to the rescue!

So someone found a flaw in your otherwise perfect code. Happens to the best of us. In both review requests, you say? Okay, we’ll let that slide for now.

Let’s update the first change. Lots of options here. You can make a new commit with the fixes, or you can amend the commit.

If it’s just a fix made in a previously un-pushed commit, we like to amend. Your choice.

$ git checkout my-branch-1
$ vim bar.py
$ git commit -a --amend
$ rbt post -u
Review request #1001 posted.

https://reviewboard.example.com/r/1001/
https://reviewboard.example.com/r/1001/diff/

Now on to the second. We’ll probably want the latest from my-branch-1 as well, so we can rebase or merge. We like to rebase when this stuff is still in flux and not yet pushed, and we like to merge when the history starts to matter (that is, when the code is in some kind of decent, landable shape).

Again, your call.

$ git checkout my-branch-2
$ git rebase my-branch-1
$ vim foo.py
$ git commit -a --amend
$ rbt post -u HEAD
Review request #1002 posted.

https://reviewboard.example.com/r/1002/
https://reviewboard.example.com/r/1002/diff/

The -u flag updates an existing review request that matches your commit message. If you’ve modified the summary or description in any way, it may prompt you for any review requests that mostly match. Just say yes or no.

Great, publish those changes. Eventually the code will be perfect.

Got your “Ship It!”? Time to land!

RBTools 0.7 and higher comes with a nifty little command, rbt land. This command takes a branch, verifies that it’s been reviewed, and lands the changes.

Let’s land both of your branches, one after the other.

$ git checkout master
$ rbt land --dest=master --push my-branch-1
$ rbt land --dest=master --push my-branch-2

This will verify that my-branch-1 is approved (at least one “Ship It!” and no open issues). It will then merge my-branch-1 into master, push it, and delete the old branch. Then it’ll verify, merge, push, and delete my-branch-2.

Each branch you land will be merged into master, with a merge commit containing the summary, description, bug numbers, and review request URL. If you want to instead squash each branch into a single commit on master, you can use --squash.

You can use --dry-run to see what will happen without actually changing your tree. Useful when you first start off.

You can also edit the commit message using --edit, or leave out --push if you don’t want to push the branch, or add --no-delete-branch if you don’t want to delete the branches. You can also set the default branch to land into. The documentation goes into all the options that are available.

Closing out landed review requests

We like to set up our review requests to auto-close when pushing commits. This is designed to work with rbt land.

When you land a change, the commit message will contain a line saying something like:

Reviewed at https://reviewboard.example.com/r/1001/

The auto-close hooks will see that and automatically close your review request, so you don’t have to.

And that’s how we do it.

There’s really a lot of options here. Some people push changes and then use the web UI to post them for review. Some people generate their own diffs and upload them. Some like to merge their own branches.

That’s all a lot of work, though. Our method give us:

  • Nice code organization, since every review request has its own dedicated branch.
  • Fast posting and updating of review requests.
  • Less mess. No extra branches sticking around, and review requests are automatically closed.
  • Confidence that every landed change has been approved. No slip-ups with pushing the wrong branch.

Give it a try!

Read More
Composing workflows using aliases in RBTools

RBTools 0.7 introduced support for aliases, a handy way to simplify common tasks and workflows when working with source code and review requests.

With aliases, you can write your own RBTools commands that expand into, well, anything. They could be a set of common options for an existing command, or they could call out to shell commands.

You can define your own aliases for your personal use, but you can also define aliases for your entire team. Since they live in .reviewboardrc, aliases can be committed to your repository for everyone to use. This is quite powerful, as it can help to easily standardize workflows for your whole team.

I’m going to show you a few ways to compose workflows using aliases.

Simplify posting code for review

Feature branches in Git are great. They help you to stay organized when you have lots of changes that depend on each other. If you’ve made heavy use of them, you’ve probably used this workflow a bit:

# Post some code...
$ rbt post HEAD

# After making some changes to code...
$ rbt post -u HEAD

# After making some changes to the commit message...
$ rbt post -g yes -u HEAD

There aren’t a lot of parameters there, but you still have to remember them and type them every time. The -u HEAD or the -g yes -u HEAD gets repetitive.

Let’s add a few nice and short aliases in ~/.reviewboardrc:

ALIASES = {
    # Post this
    'pt': 'post HEAD',

    # Post this and update
    'ptu': 'post -u HEAD',

    # Post this, update, and re-guess the description from the commit message
    'ptug': 'post -g yes -u HEAD',
}

Now the workflow becomes simply:

# Post some code...
$ rbt pt

# After making some changes to code...
$ rbt ptu

# After making some changes to the commit message...
$ rbt ptug

Much shorter, and hopefully easier to remember.

Run unit tests before posting code

If your project has a unit test suite, you’re probably supposed to run it before posting code for review. It’s easy to forget, or to just ignore it, since it’s another step in your process. We can solve both of those problems.

Say your project has a ./scripts/run-tests.sh that runs your test suite and outputs 1 for failure, 0 for success. Let’s make an alias that ensures tests pass before posting, and we’ll even pre-populate the Testing Done field with a message stating they pass. Let’s call this p for short.

ALIASES = {
    'p': '!./scripts/run-tests.sh &&'
         'rbt post --testing-done="Unit tests pass." $*',
}

Now you’ll never forget to run tests, and you’ll even have less to type.

ProTip: Define this as an alias in the .reviewboardrc in your repository, and switch your team to use that instead of rbt post.

Sanity-check patches on a review request

If you’re the gatekeeper for your project’s code (perhaps you’re an open source developer?), you need to test the patches that other people write before landing them. Thanks to rbt patch, you can easily pull down a diff from a review request and apply it, but you still need to run your tests before landing it. You also need to be careful not to disturb any changes in your own tree, or to test on the wrong branch.

To really sandbox your testing, your ideal workflow may look something like this:

$ git clone -b master . /tmp/test-project-<review request id>
$ cd /tmp/test-project-<review request id>
$ rbt patch <review request id>
$ ./scripts/runtests.sh
$ cd -
$ rm -rf /tmp/test-project-<reviw request id>

Let’s make an alias for this:

ALIASES = {
    'test-patch': '!rm -rf /tmp/test-project-$1 &&'
                  'git clone -b master . /tmp/test-project-$1 &&'
                  'cd /tmp/test-project-$1 &&'
                  'rbt patch $1 &&'
                  './scripts/runtests.sh &&'
                  'rm -rf /tmp/test-project-$1',
}

Now you have a quick and easy way to check any patch applying to the repository you’re currently in, without messing up your repository, typing a bunch of commands, or worrying about directories.

Screenshot a window and attach it in one go

If you’re doing UI work, you’re posting screenshots a lot. This means taking a screenshot, saving it somewhere, and drag-and-dropping it into a review request with a caption.

Let’s get that down to one command.

Now, different operating systems have different tools for capturing a screenshot. I’ll show an example for MacOS X and another for Linux. For Windows, you’ll need to grab a command line screenshot tool.

ALIASES = {
    # For MacOS X:
    'attach-screenshot': '!screencapture -wo /tmp/screenshot.png &&'
                         'rbt attach --caption "$2" $1 /tmp/screenshot.png &&'
                         'rm /tmp/screenshot.png',

    # For Linux:
    'attach-screenshot': '!import /tmp/screenshot.png &&'
                         'rbt attach $* tmp/screenshot.png &&'
                         'rm /tmp/screenshot.png',
}

Now uploading a screenshot is quick and easy! To upload to review request #123, just run:

$ rbt attach-screenshot 123

You can even attach a caption or custom filename, like so:

$ rbt attach-screenshot --caption="About dialog" --filename=about-dlg.png 123

Share your workflows!

We’d love to hear about any workflows you come up with. Send them along. We may even feature them in a future post or as samples in the documentation!

Read More

4 powerful tips for your Review Board dashboard

The dashboard. It’s the very first thing you’ll typically see when you log into Review Board. Outside of review requests and the diff viewer, you’ll spend most of your time here – but are you getting the most out of it?

Did you know that you could close several review requests at once? Or see which review requests were specifically assigned to you, or the number of lines added/removed in each diff, or the bugs addressed, all at a glance? How about being able to keep track of activity on groups you’re not a part of?

Let’s go through some of the ways you can make the dashboard work better for you.

1. Choosing what information to display

Available columns

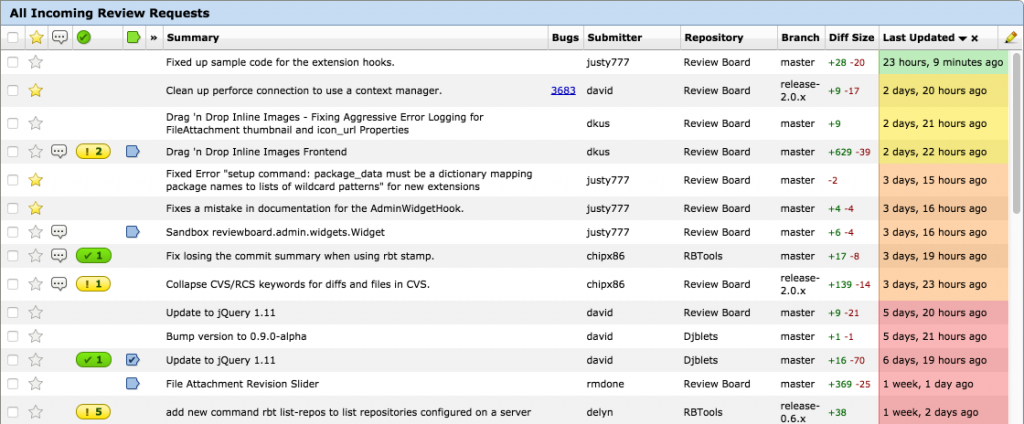
Take a look at the top-right of the dashboard, at the very last column. See that pencil icon? If you click it, you’re going to see a list of all the columns you can put on your dashboard. You can turn some on, turn others off.

Depending on how old your account is, you may be using an older default set of columns, meaning you’re really missing out on some handy columns.

Here are my favorites:

  • Diff Size, newly introduced in 2.0 and on RBCommons, takes the latest diff on the review request and shows the number of lines added and removed. This gives me a good idea as to how long a review may take.
  • My Comments is a default now, but it wasn’t always. This displays a handy icon showing if you’ve already reviewed a change, if that review is still a pending draft, and whether you’ve said Ship It! Super helpful for sorting through your workload.
  • Select Rows, also introduced in 2.0 and on RBCommons, adds a little checkbox for selecting review requests. Selecting one or more lets you perform actions, which we’ll go into below.
  • Ship It! is your way of knowing if reviewers have deemed a change ready to ship, or if there’s any issues to resolve (on 2.0+ and on RBCommons). Green checkmark for Ship It, and yellow exclamation point for issues to resolve. If you don’t have this column, add it now!
  • Starred lets you click to star/unstar a review request. Starring is a way to keep tabs on the activity on a review request you’re not assigned to, CCing you on all e-mails and making the review request quick to find in the dashboard.
  • To Me simply displays a little indicator (») for any review request directly assigned to you. Usually a good place to start when deciding what to review.

Here’s how my dashboard looks:

Dashboard with extra columns

2. Reorder your columns

Okay, now you have some new columns, and they’re all shoved to the right of the dashboard. That’s probably not where you want them. That’s okay, we can fix that.

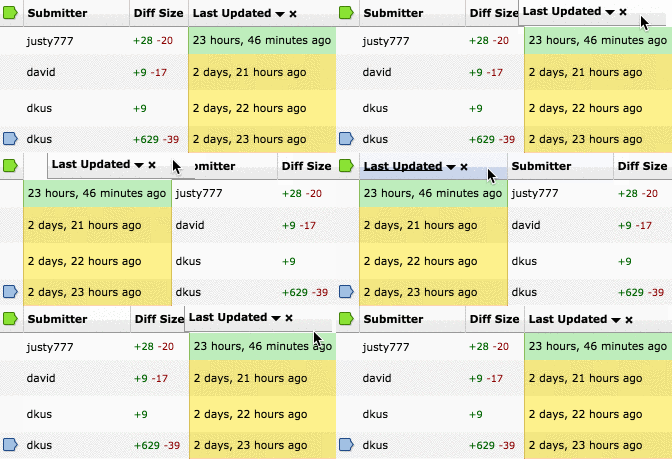
You can re-order columns by simply clicking and dragging the column header. Move it where you want it, and the dashboard will remember.

Reordering Columns


I like placing all the little icons (Starred, My Updates, Ship It!, My Comments, and To Me) toward the left, right before the summary. Play around, see what works for you. Go nuts.

3. Sort your columns

You now have a lovely set of columns exactly where you want them. There’s some timestamps in there, maybe the repository or branch names. Now’s a good time to learn about sorting.

Certain columns can sort their data. Most anything with text, like Summary, Branch, or Last Updated, can be sorted. When you click a column, it’ll sort in ascending order. Click again to sort in descending. Click the “X” to unsort that column.

Sorting Columns


There are two levels of sorting. Click a second column, and everything will be sorted by that. If two rows have the same data for that column, then they’ll be sorted by the previously clicked column.

To prioritize changes going into a release, click Last Updated and then Branch. You’ll quickly be able to see review requests grouped by branch, then sorted by when they were last updated.

4. Close many review requests at once

Is your dashboard getting a bit messy? Did you forget to close a bunch of old review requests, and just hate the thought of going through and dealing with them one-by-one? Or maybe you’re an administrator and someone just left the company with a mess to deal with.

Remember that Select Rows column from before? It gives you a nice little checkbox for each review request. When you start clicking those checkboxes, the dashboard’s sidebar will begin to give you a summary of the review requests, along with options to close them all at once. You can discard them, or mark them as submitted into the codebase.

Dashboard batch operations

In one go, you can clear away dozens of review requests, making everyone else on the team very thankful, and completely in your debt.

Speaking of…

Happy Holidays!
Next time, we’re going to talk about how to keep your dashboard squeaky clean, without micromanaging review requests. You’ll learn how you can put an end to messy dashboards once and for all.

In the meantime, Happy Holidays everyone!

Read More