Introducing Issue Verification and Ship-It! Revocation

We’ve all been there…

It’s a week before the deadline. Your team is working through the night, eager to land their changes as quickly as possible. Your teammate, Jake, was feeling frazzled as he was trying to fix all the issues that had been filed on his review request. He’d just finished the issue you had filed and marked it “fixed.” Shortly after, another teammate files a new review with a “Ship It!” Breathing a sigh of relief, and eager to go home, Jake immediately lands the change.

It wasn’t until after the release of the product that you realized Jake had missed something important in your feedback. While his change had fixed the bug, it had broken another feature. You hadn’t had the chance to look over his change after he’d fixed it, since you were busy and it had fallen off your dashboard once it landed. If only Jake knew you wanted to take a second look, the release would have gone a lot more smoothly.

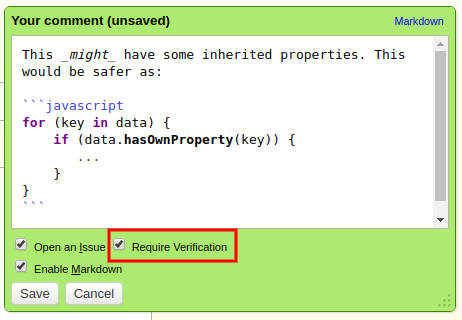
With Review Board 3.0, you can prevent this from ever happening again. We’ve added a new feature, Issue Verification, which keeps issues open until the reviewer has a chance to verify the fix.

You can activate this feature by checking the “Require Verification” box when opening a new issue.


Once the owner of the change resolves the issue as “Fixed” or “Dropped,” the status will change to “Pending Verification.” At this point, the issue is still considered open. It will be up to the reviewer to look over the fix and click “Verify Fixed” before it can be closed.


Filed a Ship It! prematurely and wish you could take it back?

Now you can with Review Board 3.0’s new Revocable Ship It! feature. The “Ship It!” label on any reviews you file will now have a little “x” button. Just click and confirm that you want to revoke it, and the review’s “Ship It!” tag will be removed, with the “Ship It!” text crossed out in the review.


These new features will help ensure that important reviewer feedback is addressed and that an unintentional or outdated “Ship It!” review no longer lets changes into the codebase prematurely. These features have been requested by many of you, and we would love to hear if they improve the review process for your team!

Read More

Introducing Slack Support in Review Board 3.0

One of the highlights of the recently release Review Board 3.0 is our new integration with Slack. Projects and companies around the world use Slack for communication and collaboration within their teams. It also hooks into third-party products and services to provide live updates in chat. By enabling the Slack integration in Review Board 3.0, you will be able to keep your team informed of discussions and updates on review requests as they happen.


You can create as many Slack configurations as you need for your company. Each configuration can be customized based on your needs. For example, review requests for different groups can go to different channels. Those containing sensitive information such as security fixes can be filtered out entirely.


Getting Started

First, create an incoming Webhook integration on Slack. Once it has been created, Slack will generate a Webhook URL, which you’ll plug into Review Board in your new configuration. To create that configuration, open the Administration UI in Review Board and navigate to Integrations → Slack → Add A New Configuration. Paste your Webhook URL, like so:


Now you’re ready to customize your configuration by adding conditions. By default, a Slack configuration will post all discussions and updates to the channel. If you want to limit what’s posted, you can add one or more conditions to your configuration. These will operate off the data in the review requests being sent to Slack.


You have a lot of options when adding conditions. You can include or exclude messages depending on the review groups, repositories, summary and description content, branch field, and more. Custom extensions can even add new options, giving further control based on data and logic provided by the extension.

We hope this new integration will be a big help for your team members and your company as a whole. This has been a highly anticipated feature for some time now, requested by many of our users. We are excited to finally be able to bring it to you!

Read More

Announcing virtualenv-multiver for Python Development

If you’ve worked with virtualenvs for Python before for development/testing, then you may have hit cases where you really wanted multiple versions of Python installed in your virtualenv. Which, you may actually have working, because virtualenv, in theory, supports this. In fact, you’re supposed to be able to do:

$ virtualenv -p python2.6 my-env
$ virtualenv -p python2.7 my-env

That’d be great, if it always worked. It doesn’t. When your virtualenv gets built, bin/python may end up being a link to bin/python2.7 (or what have you), or it may be the contents instead of a link. Subsequent installs may end up overwriting binaries, producing a python2.6 and python2.7that are both Python 2.7.

Oh and it gets worse. On Mac, with a standard Python install, these binaries actually end up invoking ../.Python, a symlink pointing to the system Python. This link is not versioned. So much for multiple Python versions in one virtualenv on the Mac.

A solution!

We fixed this. Now you can run a single command to get a working environment going, without messing with things or running into problems on the Mac. This is virtualenv-multiver.

Now, setting up an environment is as simple as:

$ pip install virtualenv-multiver
$ virtualenv-multiver my-env 2.6 2.7

Couldn’t be easier. This works both for new environments and existing ones.

This is a beta, so there may be some issues here or there. If this is useful to you, give it a try and let us know!

Read More

Better branch navigation with git-j

One of Git’s core strengths are its simple, light-weight branches. Spend any time working with Git and you’ll soon develop the habit of creating feature branches for any change. As your project grows, you may start to introduce release branches, hotfix branches, and long-running feature branches.

Navigating between branches becomes a common task. A simple git checkout <branchname> is all it takes. Not so bad, but if you’re frequently switching between branches, all the typing can add up.

That’s where git-j comes in.

git j is not only faster to type than git checkout, but it also offers some quick shortcuts for fast branch navigation, making it just as easy as directory navigation.

Here, I’ll show you.

Go up a branch with git j ..

Much like directory navigation, git j .. jumps to the nearest parent branch.

Let’s say you have this branch scheme:

o [topicB] [HEAD]
|
o [topicA]
|
o [master]
|

Say you want to go down a level to topicA, do some work, and then go down again to master. Using git j ..:

$ git j ..
# Do some work
$ git j ..

Now you’re on master. Check out the savings compared to git checkout:

$ git checkout topicA
# Do some work
$ git checkout master

Hey look, you’ve saved 22 keystrokes!

Jump to your previous branch with git j -

Ever find yourself switching back-and-forth between two branches? We have a handy shortcut for that.

Let’s go back to our branch scheme from before. You’re on topicB, and you need to go down a branch to topicA, do some work, and jump back to topicB.

Simple.

$ git j ..
# Do some work
$ git j -

Much nicer than the alternative:

$ git checkout topicA
# Do some work
$ git checkout topicB

That’s another 23 keystrokes saved.

Use aliases for common branches

You probably have a few branches you’re frequently on, and I bet one of them is master. Let’s say that another is release-1.0.x. Oh, let’s also throw in something like 2.0/big-refactor on top of that.

How often are you typing those branch names? Every typo any of them? I sure have.

We can shorten all those names with git j alias. Let’s give them nice, short, easy-to-remember names:

$ git j alias m=master
$ git j alias 1.0=release-1.0.x
$ git j alias rf=2.0/big-refactor`

Now instead of typing those branch names, all you have to do is pass the aliases to git j, like so:

$ git j m
$ git j 1.0
$ git j rf

Much nicer than:

$ git checkout master
$ git cehckout release-1.0.x
$ git checkout 2.0/big-refactor

Wouldn’t you say?

I use that m alias all the time, since practically all Git repositories have a master branch. Instead of setting up an alias for all of them, I can make a global alias:

$ git j alias -g m=master

Now git j m will work wherever I go!

To unset an alias, just pass an empty branch name:

$ git j alias rf=

By the way, if you ever need to check which aliases you’ve set up, just simply type git j aliases. For global aliases, git j aliases -g.

Working with branch history

git j keeps track of which branches you’ve checked out most recently, and makes it easy to jump between them.

Simply run git j history to see what your branch history looks like.

Want to quickly jump to a branch in your history? git j <number> is all you need. For instance, git j 2 will jump 2 branches back in your history.

Putting it all together

Okay, here’s a big, real-world-ish example. Our Review Board repository has master and release-2.0.x branches, and I’ve introduced a my-feature branch. In this example, I’m going to:

  1. Work on release-2.0.x.
  2. Rebase my-feature on top of it.
  3. Merge it into release-2.0.x.
  4. Merge the latest release-2.0.x changes into master.
  5. Go back to working on release-2.0.x.

First, here’s how you’d traditionally do this with Git:

# 1. Work on release-2.0.x.
$ git checkout release-2.0.x

# 2. Rebase my-feature on top of it.
$ git checkout my-feature
$ git rebase release-2.0.x

# 3. Merge it into release-2.0.x.
$ git checkout release-2.0.x
$ git merge my-feature

# 4. Merge the latest release-2.0.x changes into master.
$ git checkout master
$ git merge release-2.0.x

# 5. Go back to working on release-2.0.x.
$ git checkout release-2.0.x

Now let’s try it with git j, and with a couple of aliases (m for master, 2.0 for release-2.0.x):

# 1. Work on release-2.0.x.
$ git j 2.0

# 2. Rebase my-feature on top of it.
$ git j my-feature
$ git rebase release-2.0.x

# 3. Merge it into release-2.0.x.
$ git j ..
$ git merge my-feature

# 4. Merge the latest release-2.0.x changes into master.
$ git j m
$ git merge release-2.0.x

# 5. Go back to working on release-2.0.x.
$ git j -

How’s that for less typing? As you start to work with git-j, it’ll all start feeling more natural, just like walking a filesystem.

Get started with git-j today!

Simply clone our dev-goodies repository and stick dev-goodies/bin/git-j somewhere in your path. Or, stick all of dev-goodies/bin/ in your path to get easy access to all our scripts.

We’ll talk more next week about another extremely useful git script we provide called git-rebase-chain. Stay tuned!

Read More